There are times when we need to share files from our computer to others. Instead of sending the files by email or bluetooth or using USB drives, it may be more convenient to just create a shared folder. That way, others can conveniently access the shared files and also add files if necessary for you to access on the shared folder. Depending on the level of access you want to grant, you can give full access or only read permissions. In this post, we will see how to create a shared folder on local area network. You can share files at home on LAN or with co-workers in Office LAN.
There are various ways to create shared folder on Windows computer. We’ll see some of them here.
How to create a shared folder on local area network using Windows Computer?
1) Simplest way to share folder in Windows computer
If you have not yet decided on a folder to share, create a new folder on your computer which you want to share.
- Right-click on the folder you want to share and then select “Give Access to > Specific people“
- A network access window will appear. Click on the drop-down and select the specific user* or Everyone and click Add.
- After adding the user, set the permission level (read-only or read/write).
- And then, click Share.
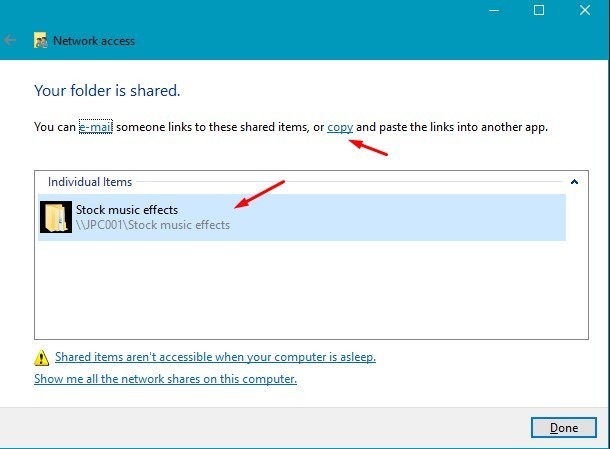
- After that a Window will appear where the link to the shared folder is displayed. Click on the ‘copy’ link included to copy the path to the shared folder. You can send this link to the other user to access the shared folder over the local network.
Specific People / User accounts:
If ‘password protected sharing’ is turned on in network settings, then users will need to type in a username and password of the user account on your computer to access the shared folder. If you do not want to let other users access the shared folder using your password, you may create a separate user account with a password, and then give access to this user account on the shared folder. The users accessing the shared folder will then access the share folder with the new user account credentials when prompted by Windows.
How to check if you have shared folders on your computer?
- Open Windows File Explorer
- Type \\localhost in the address bar
If you have shared folders, you will see the shared folders at \\localhost.
How to access the shared folder from the other computer on network:
To access the folder you have shared, simply copy the shared folder link / path shared by you, and then open Windows File Explorer and paste the link in the address bar. Hit Enter. The user should be able to access the shared folder with the link now.
Another way to access the shared folder:
- Open Windows File Explorer
- From the left sidebar, find ‘Network‘ and click on it. List of computer which have shared folders and printers will be displayed.
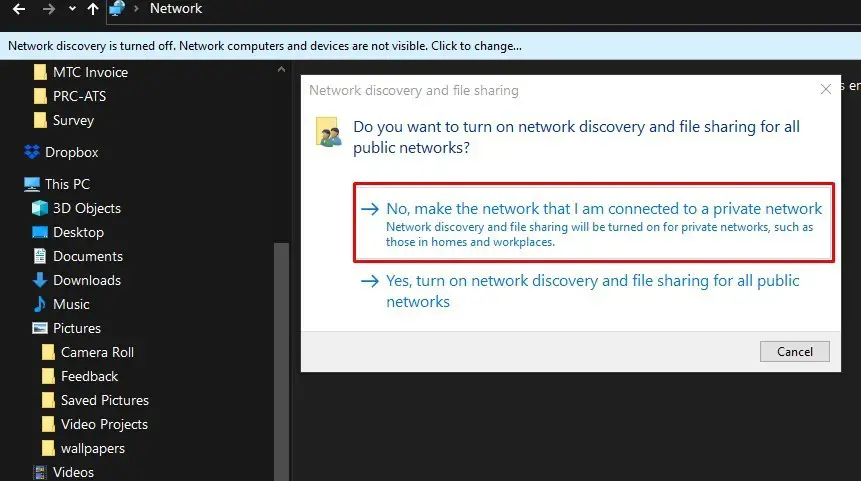
To see shared folders and printers on network, ‘Network Discovery’ must be turned on to see devices on the network that are sharing files. If it is not turned on, Windows will inform you. If you open File Explorer and go to Network, you will see an error message (“Network discovery is turned off….”). To turn ‘Network Discovery’ on, select the Network discovery is turned off banner, then select Turn on network discovery and file sharing.
- After clicking ‘Network’, if you can see computers in the network, find the computer.
If the shared folder link is ‘\\JPC001\SharedFolder’, then ‘JPC001‘ is the computer name.
- Double click on the computer name ‘JPC001‘.
- You should be able to see the shared folders and printers if any.
To stop sharing the shared folder:
- Right-click on the shared folder and then select “Give Access to > Remove Access“
- Click on ‘Stop Sharing‘
2) Create Shared Folder in Windows with Advanced Sharing
If you are creating shared folder for use in a trusted local area network at home or office, the above sharing method will work just fine. But if you want to share to a specific person or customize the permissions, you can create shared folder with advanced settings.
To create shared folder with advanced sharing settings, do the following steps:
- Open File Explorer.
- Find the folder you want to share.
- Right-click the folder and select Properties.
- Click on the Sharing tab > Advanced Sharing button.
- Check the ‘Share this folder‘ checkbox.
- Edit the shared folder name if necessary.
- Click the Permissions button.
- On the “Permissions” window, “Everyone” group is already added by default. In the permissions section below, you can customize the permissions for a specific user or group.
If you want to share files with only a specific user, then continue the steps below, otherwise, click OK > OK > Close to complete the setup.
If you only want to share files with only a specific user, do the following:
- After clicking the Permissions button, select the Everyone group and click Remove.
- Click Add button.
- Type the name of the user you want to share the files with.
- Click the Check Name button.
- Click the OK button.
- Select the user account. “Read” permission is enabled by default. If you want the user to edit, delete, and create new files, select the Change permission also.
- Click the Apply button.
- Click the OK button.
Note the shared folder network path and share the path for others to access the shared folder.
How to access the shared folder from the other computer on network:
- From the other computer in the network, Open Windows File Explorer
- Type or paste the link to the shared folder in the address bar. Hit Enter.
OR
- Open Windows File Explorer
- From the left sidebar, find ‘Network‘ and click on it. List of computer which have shared folders and printers will be displayed.
Shared folder without password
By default, shared folders on Windows computer are secured with a username and password. This means the user accessing the shared folder need to know the username and password of the user account on the computer sharing the folder.
If you do not want to let other users access the shared folder using account and password, you may create a separate user account with a password. Then, give access to this user account when creating the shared folder. The users accessing the shared folder will then access the share folder with the new user account credentials when prompted by Windows.
If you’re setting up file sharing on a local network for your family members or on office LAN, you may disable the requirement to enter Windows credentials to allow users to access the shared folders with entering password.
To disable password protection on shared folder in Windows, do the following:
- Open Control Panel.
- Click on Network and Internet > Click on Network and Sharing Center.
- On the left pane, click the Change advanced sharing settings link.
- Expand the All Networks.
- Under “Password protected sharing” , select ‘Turn off password protected sharing’ option.
- Click the Save changes.
By turning off the password protected settings, users will be able to access the shared folder without a password.
# How to create shared folder on Windows
# Access shared folder on Windows without password
# Shared Folder Permissions
# Shared Folder on local area network
# Advanced sharing option for shared folder