There was a time when website owners used to manually insert Google Adsense Code on websites to monetize. Then came Google Auto Ads, where Google automatically places Adsense ads on your website. In this post, we will see how to enable Google Adsense Auto Ads on your website?
Google Adsense Auto Ads was announced in a post on Inside Adsense on 21 February 2018. In the post Google mentioned that Adsense Auto ads will use machine learning to make smart ad placement and monetization decisions, saving you time. Unlike manually placing Google Adsense code, publishers need to place code just once to all the pages where Auto Ads need to be displayed, and Google would take care of the rest as far as display of ads is concerned. As per the post in the Google Inside Adsense, Auto ads will work on new sites and also on sites where Google Adsense is already showing ads.
Benefits of using Google Adsense Auto Ads
Google Adsense Auto ads offer a simple and innovative way for you to monetize. With Google Auto ads, you place one piece of code, and Google ads will appear across your site. Google Auto ads scans your site and automatically place ads where they’re likely to perform well and potentially generate more revenue.
While manually adding Google Adsense code gives the website owner exclusive control where to display ads, it may be tedious if you want to experiment with various ad layout, size and frequency. Google Adsense Auto Ads also has its own benefits.
- Easy to use as website owners need to place one piece of ad code to get started. You do not need to manually add Google Adsense Code at different places.
- Responsive– Google Auto ads will automatically adjust to the space available and changes in site layouts.
- Potentially increase your revenue as Auto ads analyze your pages and find new places to show ads based on your layout, content, and existing Google ads.
- Control over where ads appear on your site from Google Adsense Ad settings.
- Google Auto ads are mobile friendly. Auto ads automatically adjust to every screen size.
How to enable Adsense Auto Ads?
- Sign in to AdSense account.
- In the left navigation panel, click on ‘My ads’ and select Get Started.
(If you don’t see Get Started, Auto Ads are under ‘MyAds’ > Content) - On the “Choose your global settings” page, select the ad formats that you’d like to show and click Save. Just click on the toggle / switch buttons to enable or disable.
- On the next page, Google Auto Ads code will be generated and displayed.
- Click Copy code.
- Paste the ad code between the < head > and </ head > tags of each page where you want to show Auto ads.
- Auto ads will start appearing on your pages in about 10-20 minutes.
After enabling Google Adsense Auto Ads, you can monitor the appearance of the ads. And if desired, you can also apply specific settings for specific URLs, Domains, Sub-Domains, Pages etc at URL group settings, which will override the global Adsense Auto Ads settings.
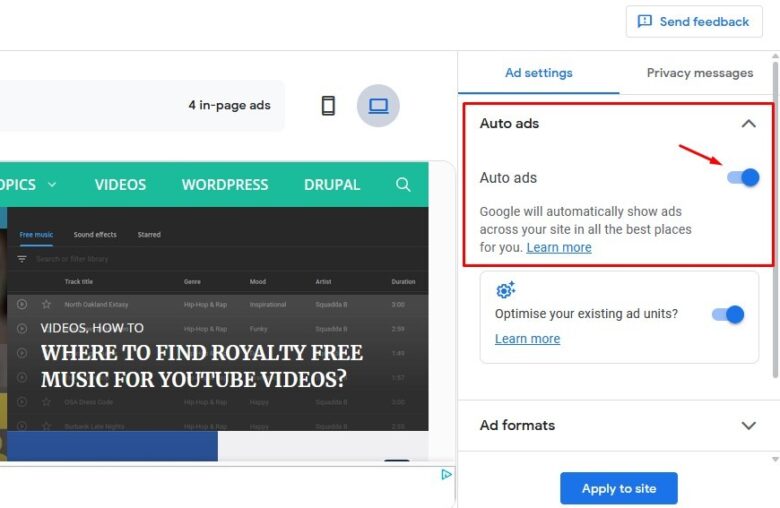
How to enable / disable Google Adsense Auto Ads by site?
If you want to disable Google Adsense by site, then you can easily do so from the Google Adsense administration page.
- Log in to your Google Adsense Account
- Click on Ads from the left hand side menu.
There are three tabs/links in this page – by site, by ad unit and global settings. - By default it is on ‘by site’. If not, click on ‘by site’.
- You will see the list of sites where your Google Adsense is applied.
- Click on the pencil icon next to the site to edit the site settings.
- Click on Auto Ads from the right menu and click on the Auto Ads toggle
- Click on Apply to site
Where to place Google Adsense Auto Ads Code on your website
As discussed above, you need to place the Google Adsense Auto Ads between the HEAD tags. Every web page have a HEAD tag. Here we will show you where to place the code in Blogger platform and WordPress platform as an example.
Where to place Google Adsense Auto Ads Code on Google Blogger (Blogspot) website
- Copy the Google Auto Ads code following the steps discussed above
- Login to Blogger
- Navigate to Blogger Dashboard > Theme > EDIT HTML
- Find <head>, which should be somewhere at the beginning
- Paste the Google Auto Ads code right after <head> or just before </head>
- Save Theme
- Wait for the Google Auto Ads to appear
Where to place Google Adsense Auto Ads Code on WordPress website
- Copy the Google Auto Ads code following the steps discussed above
- Login to WordPress as administrator
- Navigate to Appearance > Editor
- Make sure the current theme* is selected from the theme selector dropdown
- Find header.php in the right sidebar and click on it
- In the header.php code displayed, you should be able to see <head> and </head> tags.
- Place the Google Adsense Auto Ads anywhere in between <head> and </head> tags without disrupting other code already placed there.
- Scroll down and click “Update File”.
*Note: Make sure you are using a child theme for your WordPress website (recommended). Otherwise, the additions and any other changes on a WordPress theme will be lost when the theme is updated to a newer version. Check here how to create a WordPress Child Theme.
If you are using some other website platform, find the appropriate file where <head> tags are and place the Google Adsense Auto Ad Code between <head> and <\head> tags to enable Auto Ads.
# How to enable Google Adsense Auto Ads on Website
# How to disable Googel Adsense Auto Ads on website
# Where to place Adsense Auto Ad Code in Website