VLC is a free and open source cross-platform multimedia player and framework that plays most multimedia files, and various streaming protocols. It is a popular video player of choice for most users. While it can play most video formats, there are times when VLC may also face some issues when attempting to play a video – such as a black, blank video output. In this post, we address one such issue with VLC player – video appears to play as there is no error, just blank black screen.
VLC Player Unable to Play Some Videos
In this post and the video below, we present the VLC player issue where VLC player appears to play the video (AVI files) but there is no video output. There output is blank black screen. The progress bar shows activity.
Windows Media Player can play the files just fine. But not VLC player.
How to fix: VLC Player Unable to Play Some Videos
We have made a short video on how to fix this issue. You can watch the video or read on if you want to skip the video.
Step 1: Change the VIDEO OUTPUT at Video Settings
First, we tried changing the Video Output settings in the VLC player and it worded. But default, the video output s et to automatic, but we changed it to ‘OpenGL’. If you also have a similar problem where VLC Player is unable to play some video files then you can also try this setting first.
- Open VLC Player
- Click on Tools > Preferences > Click on the VIDEO tab on top
- In the VIDEO SETTINGS, find OUTPUT and change it from AUTOMATIC to something else.
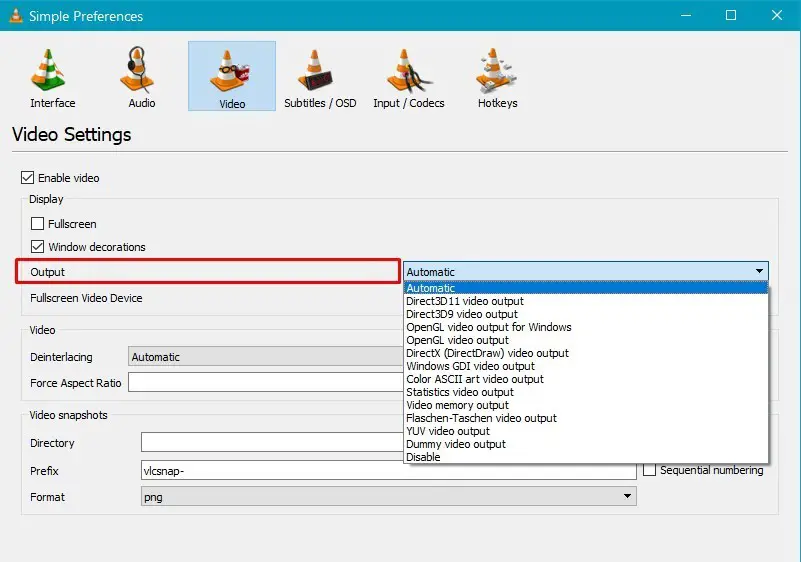
Try playing the video and see if VLC is able to play the video.
In our case, we changed the OUTPUT from AUTOMATIC to OpenGL and it worked as shown in the video above. It also worked when we change it to Windows GDI Video Output. You may experiment with others also and see which one works best for you.
Step 2: Disable Hardware Encoding
If changing the Video Output did not work in your case, you may also try by disabling the Hardware encoding.
To disable the HARDWARE ENCODING, go to:
- Open VLC Player
- Click on Tools > Preferences
- At the bottom, under ‘Show Settings’, select ‘All’
- On the left sidebar, navigate to ‘INPUT/CODECS’ > ‘Video Codecs’ > FFmpeg
- In the right side window, click on the drop-down next to HARDWARE ENCODING, and select disable.
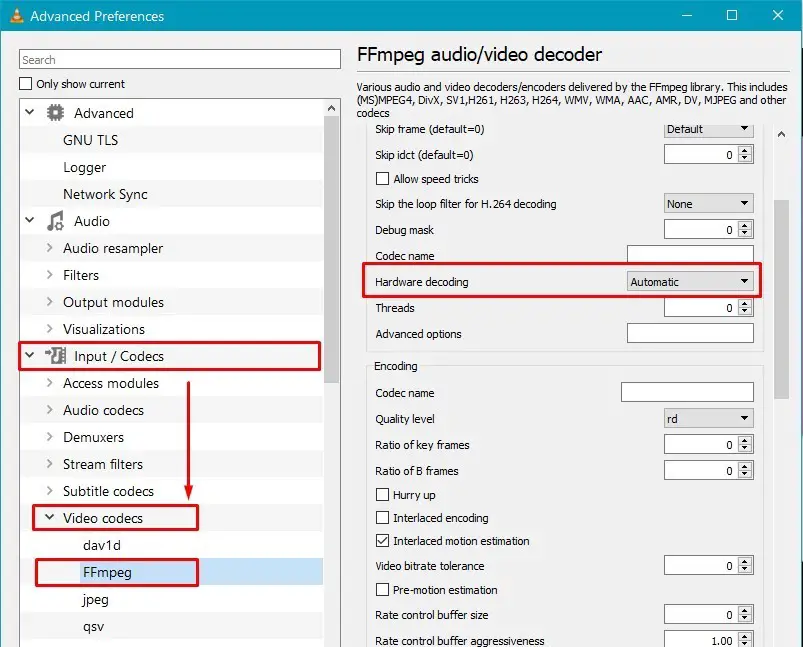
Try playing the video and see if VLC is able to play the video.
If still unresolved, you can combine the VIDEO OUTPUT setting and HARDWARE ENCODING and see how it works for you. For example:
- VIDEO OUTPUT=Automatic | HARDWARE ENCODING=Automatic
- VIDEO OUTPUT=Something | HARDWARE ENCODING=Automatic
- VIDEO OUTPUT=Automatic | HARDWARE ENCODING=Disabled
- VIDEO OUTPUT=Something | HARDWARE ENCODING=Disabled
If you were able to resolve this issue using other solution, please share it in the comments below. It may be helpful to others.