Are you looking to include a free live chat for your WordPress website so that your visitors can connect with you over chat? Besides other communication channels which might already have included in your website, a live chat may help to increase interaction, increase sales, and customers satisfaction. In this post, we shall see how to install a free life chat for your WordPress website using 3CX Live Chat plugin.
What we’ll be using to setup Live Chat on WordPress Website
The 3CX Live Chat function allows you to answer calls and messages from website visitors directly from 3CX. You can connect with your website visitors for free with the 3CX Live Chat plugin. It is easy to setup and manage communications that handles live chat as well as calls, video conferencing and team communications. Ideal for small to medium sized businesses. It is available in the cloud and offered for free.
Step 1: Sign up for 3CX account and setup live chat on your 3CX account
1. Sign up for a 3CX account here
After you sign up for your 3CX account, you can set up live chat.
- Log into your 3CX Web Client and navigate to “Admin > Voice & chat”, click on “+ Add Live Chat”.
- Choose your startup mode from “Chat icon only” or “Chat box”.
- The ‘Destination’ field shows where live chat messages or calls will be sent.
- If you are a ‘System Owner’ or a ‘System Admin’, an additional ‘Trunk Use’ option can be configured, that is, either for System Wide or Limited to group.
- System wide – Live chat will be created and will be available ‘System wide’ (This is the Default group).
- Limited to group – Live chat will be created within the chosen group.
- Enter your website address.
- Use the drop-down selection to choose what information visitors need to provide you with
- Use the radio buttons to choose if you want to allow “Chat Only” or “Phone and chat”.
You can further customize the live chat functions. A live view is also presented to see the changes.
Step 3: Enable 3CX Live Chat on your WordPress website
After you have signed up for 3CX account and setup the live chat from the web console as discussed in step 1 and step 2, copy the code for WordPress from “Voice & Chat” menu, and proceed with the next instructions.

After that, to enable 3CX Live Chat on your WordPress website, do the following.
- Log in to your WordPress website as administrator.
- Go to ‘Plugins’ > “Add New” > Search for “3CX” and click “Install Now” on the “3CX Free Live Chat” result.
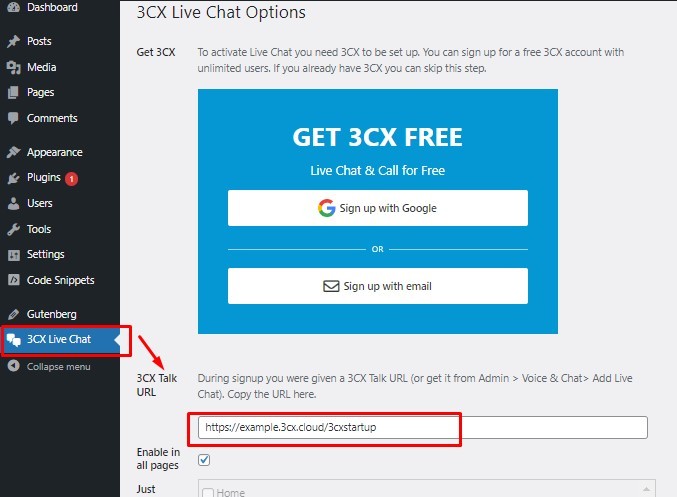
- Once the plugin is installed, click on “3CX Live Chat” in the WordPress sidebar.
- Paste the URL you copied earlier.
- Finally, click “Save Changes”.
Note: Currently the WordPress plugin will support only one Live Chat URL per website.
Tutorial Video: Setting up Live Chat
3CX for Non-WordPress sites
If you have Non-WordPress sites, 3CX also works on Drupal, Joomla, Squarespace, Wix etc. All you have to do is sign up for 3CX account, setup live chat and copy and include the HTML code in your website or web page. Refer to the user guides for other popular CMS systems.
Reference: Refer to the 3CX Live Chat manual here.