If you encounter frequent Invalid Input pop-ups on your Android smartphone, it may be SIM-Toolkit or SIM Card problem. When the Invalid Input pop-ups occurs, there are two options – OK and CANCEL. It goes away but then it appears after some time, again and again. It is quite annoying to see this frequently. Sometimes, the pop-up message is “Error in Application” also.
Here are 5 Things To Do For Invalid Input Pop-Ups On Your Android Smartphone:
1) Identity if the problem is with the SIM or not
To find if the SIM(s) is causing the Invalid Input pop-ups, enable Aeroplane or Flight mode and observe for some time.
If Invalid Input pop-up is not coming, then problem is with your SIM.
2) Find Faulty SIM in case of Dual SIM
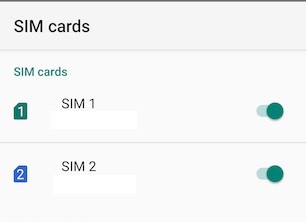
Next, if you are using Dual SIM cards on your phone, then it is necessary to find which SIM card is causing the Invalid Input pop-ups. If you have double SIM Cards in your Android smartphone, disable it one by one and observe.
- Go to Settings
- Tap on SIM card & mobile networks
- Click on SIM card that you need to disable by sliding On/Off

Do this one SIM at a time and observe whether the Invalid Input pop-ups appear or not. If a particular SIM card is enabled and the Invalid Input Pop-ups still appears, then the problem is because of that particular SIM card.
You can remove that faulty SIM card and check with another smartphone if you have.
3) Clean SIM Terminal
SIM Cards have metal contacts. Chances are there could be dirt or other substances attached to the contacts because of which the issue may be occurring. In some cases, if the SIM card is not detected by the phone, cleaning the contacts resolves the issue.
To clean the metal contacts on the SIM Card, do the following:
- Power off the phone
- Remove SIM
- Clean SIM terminals / contacts with soft cloth.
- Re-insert SIM
- Reboot your phone
Now wait for some time to see if the Invalid Input pop-ups issue is resolved or not. If the Invalid Input pop-ups still occurs, then it means the SIM Contacts are fine.
4) Try another SIM Card on the phone
In the case of Dual SIM, you can confirm which SIM card is causing the problem by disabling one SIM at a time as discussed above. But if you have single SIM, you can also take another SIM card and test it on your phone to confirm if the issue is with the phone or not.
If none of the steps above solve the Invalid Input problem on your Android Smartphone, then the problem is with the SIM Card. There is nothing much you can do from your end other than change the SIM card.
5) Change Faulty SIM with Service Provider
f you have some how ascertained that the issue is with the SIM Card by trying the troubleshooting above, get your SIM card replaced. Visit the nearest Service Centre of your network service provider and request for a new SIM. Make sure to ask them to let you keep the same phone number (Mobile number portability). This could be the fastest way to solve the issue rather than spending time trying this and that ways to figure out a solution if any exists.
Insert the new SIM. Hopefully, the Invalid Input pop-up issue will not return.
Other ways:
It seems many people have encountered this issue, and some claim to have resolved this issue by “Force Stop”. But in our case, it did not stop the Invalid Input pop-ups.
Some also claim to have resolved the problem by uninstalling the “SIM Toolkit” using adb. Normally, this SIM Toolkit app cannot be uninstalled like other normal apps. So, we are not covering it here since it would be a bit technical as it requires special software to do so. Not every one can follow this process.