If you have a new computer where you need to install Windows 10/11 from scratch or if are reinstalling Windows 10/11 on an existing computer dues to some issues, then you can easily install Windows 10/11 from a USB pen drive. While you can also install Windows 10/11 from a bootable DVD, USB is the preferred option as it is quicker. Nowadays, most laptops come without DVD drive. If your computer doesn’t have a CD or DVD drive, you may want to learn how to install Windows from a “bootable USB” to set up your operating system quickly. This is the only way on some laptops without a DVD drive. In this post, we shall see How to install Windows 10 from bootable USB pendrive?
How to create a Windows bootable USB with the Media Creation Tool
To install Windows 10/11 from a USB pen drive, we first need to create a bootable USB pen drive with Windows on it. After which, we can use the bootable Windows USB to install Windows 10/11 to the computer. We’ll see how to create the Windows bootable USB using Microsoft Media Creation Tool as it is super easy.
Using the Windows Media Creation Tool, you can upgrade your existing Windows computer or you can use it to create a USB/DVD for installation on another computer. If you are going to install Windows on another computer which is not working now, then you need to do the steps below from another computer which is connected to the internet to download the required installation media for preparation of the bootable USB.
Follow these steps to create installation media (USB flash drive or DVD) you can use to install a new copy of Windows 10, perform a clean installation, or reinstall Windows 10.
What you’ll need:
- An internet connection
- Sufficient space available on your computer, USB or external drive for the download.
- A blank USB flash drive with at least 8GB of space if you want to create media.
Step 1) Download Windows Media Creation Tool from Microsoft
- Go to this Microsoft page and download the Windows Media Creation Tool
- Click on the DOWNLOAD TOOL NOW
- Save the MediaCreationTool21H2. exe file on your computer
- After the download is complete, double click on the downloaded file to run
- When prompted, Accept the license
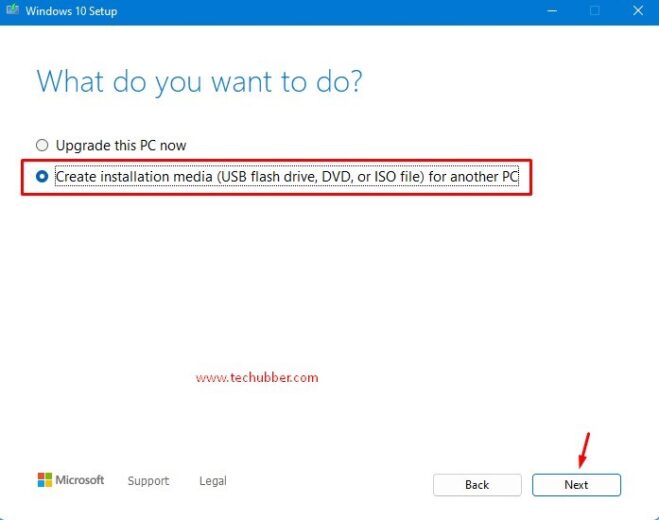
- On the page where it says “What do you want to do?”, Select Create installation media (USB flash drive, DVD, or ISO file) for another PC and click the Next button.
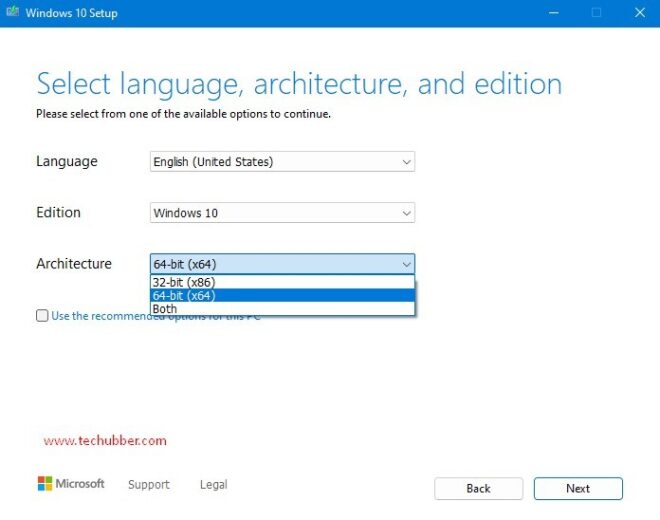
- Choose preferred language, Windows edition, and System Architecture: You will come to a page where you can set your preferred language, Windows edition, and System Architecture. If the computer on which you running the Windows Media Creation Tool is also running Windows 10/11, and you require similar settings, you can also check the Use the recommended options for this PC option and proceed.
- Next, you will see “Choose which media to use” – with USB flash drive or ISO file as options.
Since we are creating a bootable Windows USB, choose the USB flash drive and select your USB from the list. The Windows installation files will start to download to your USB drive.
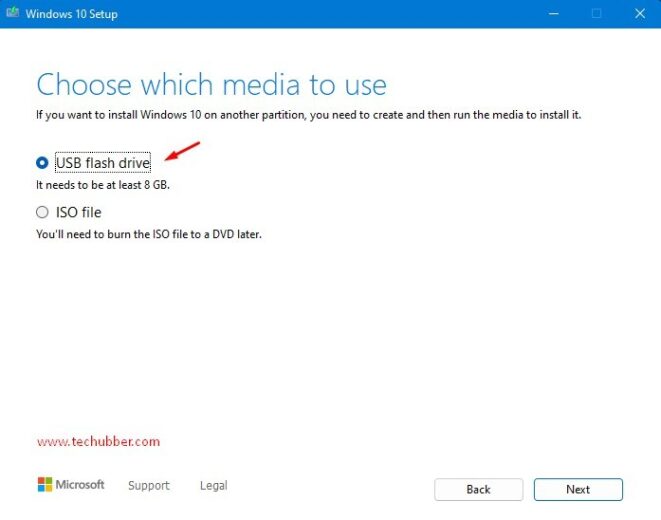
Note: If you want to install from DVD, you should choose ISO file. After the ISO file is created by the Windows Media Creation Tool, you will need to burn it to a DVD. After which, you can use the DVD to install Windows 10/11.
- After this step, the Windows 10/11 installation media will be downloaded from Microsoft. You can see the progress displayed. The Windows Media Creation tool will automatically create the bootable Windows USB.
Once the process is completed, you can close the Windows Media Creation tool and remove the USB from your computer.
We are now ready to install Windows from the bootable USB we just created using the Windows Media Creation tool.
Step 2) BIOS settings required to boot Windows from USB
After creating a Windows bootable USB drive, you can now boot from USB to install the Windows 10/11. But before that, you need to set proper boot order in the BIOS or UEFI. Computers maintain a list of boot options in the BIOS which instructs the computer from where to read files first.We need to tell the computer to boot first from the USB since we want to install Windows from the USB. For that you need to get into BIOS on the computer where you need to install Windows from USB.
The BIOS key may vary depending on the manufacturer. In order to access BIOS on a Windows PC, you must press your BIOS key set by your manufacturer which could be F10, F2, F12, F1, or DEL.
- Power on your computer
- Quickly press the BIOS key (if may also be displayed on the screen for a short time)
- Once inside BIOS, go to the BOOT main menu and look for the Boot Priority list and chance the first boot priority to USB
- Save and exit
Step 3) How to Install Windows 10/11 using the Bootable USB
We are now ready to install Windows 10/11 from the USB drive we created.
- Attach the USB flash drive on the computer where you want to install Windows 10/11.
- Restart your PC
- If the boot order is set correctly, it should now start booting from the USB which contains the Windows 10/11 installation media. Otherwise, quickly press the Boot Menu Key on the keyboard and select USB.
- Windows installation will commence from the USB.
- Choose your preferred language, timezone, currency, and keyboard settings.
- Follow the on-screen instructions
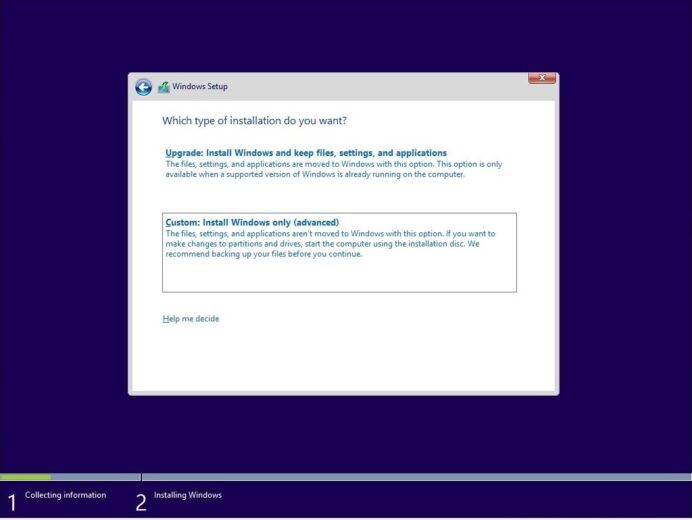
- Choose your installation type – UPGRADE OR CUSTOM
-
- Choose UPGRADE – if you are upgrading your existing Windows OS – which will allow keeping your current files, settings, and apps.
Choose CUSTOM: to do a fresh clean installation
- Choose UPGRADE – if you are upgrading your existing Windows OS – which will allow keeping your current files, settings, and apps.
- Disk Partitions: Next, you will come to a page where you need to select the disk partition on which to install Windows 10/11. If you have a fresh hard disk, then you can create partitions from here too. But to keep things simple, just proceed with just one partition as you can create more partitions later after the Windows installation is complete.
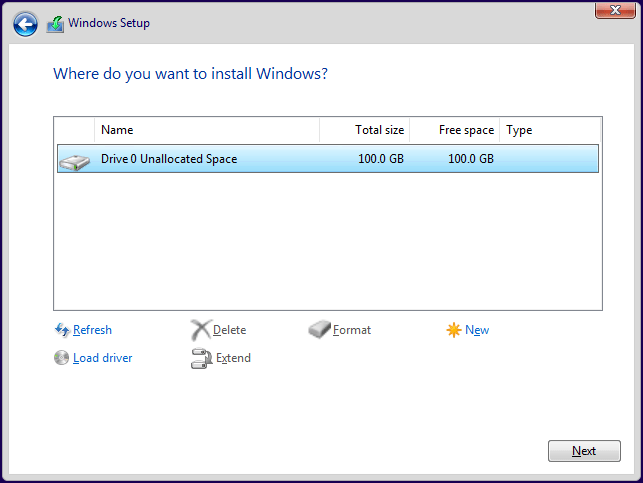
If it is a fresh hard disk: If the disk shows no partitions and says UNALLOCATED SPACE
-
- Click NEW >It asks for a new size for the partition > Click Apply to take all available space for the partition
- Then click FORMAT.
- Select this partition and proceed with the Windows installation.
If it is an existing hard drive with partitions already
-
- Select the partition on which you want to install Windows and click FORMAT.
- If you want to remove all the existing partitions and start afresh, delete all the partitions one by one. The entire disk will be ‘unallocated’ space.
- Then you can click on NEW, and then FORMAT.
- Select this partition and proceed with the Windows installation.
- Now select the partition where you want to install Windows and click Next.
The Windows 10 installation process will begin. Your computer may reboot a few times during the process. This is normal.
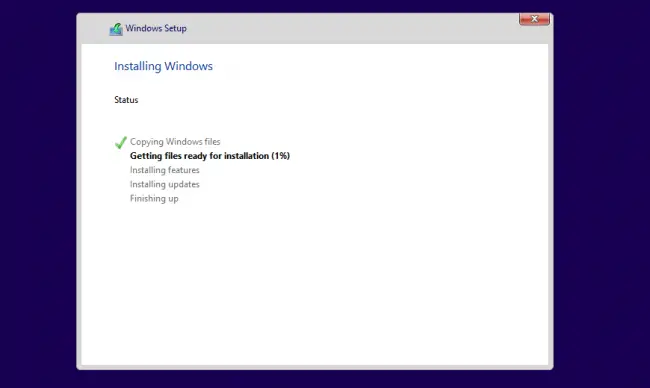
- After the installation is complete, your computer will automatically restart one last time.
Windows will display various settings information on screen for you to choose your settings. Follow the on-screen instructions to setup your Windows computer. - Finally, sign in to your Microsoft account. This is beneficial to use some of the new features with Windows 10, such as password recovery, and to access One Drive.
If you don’t want to sign in with your Microsoft account, click Skip this step and follow the instructions to create a local user account instead.
This completes the installation of Windows 10/11 from bootable USB drive created using Windows Media Creation Tool. It is super easy.
Windows Activation after Windows Installation
After installation of Windows, you can activate Windows if you have Windows 10/11 licence. See this post regarding how to check for Windows activation status, and how to change the product key to activate Windows licence key.
- Click on the Start button >and then select Settings > Update & Security and then select Activation .
- Your activation status will be listed.
If you do not have Windows 10/11 licence, you can purchase from Microsoft store right from the Windows activation screen.
Don’t have Windows 11 OS?
You can buy it on Amazon on great discounts. Check out the link below.
Microsoft Windows 11 Pro 64-Bit | FPP | USB 3.0 | Single License

# How to install Windows 10/11 from bootable USB
# BIOS settings required for Windows installation from USB
# BIOS Boot Menu Options
# Creating bootable Windows USB from Windows Media Creation Tool