There was a time when we used to keep our phones for many years. That was the time when electronics were pretty expensive and choices were few. But now, things have changed. The average lifespan of our electronics have also reduced. Nowadays, we want to replace our electronics after a few years, if not months for some. And one such device which we want to replace with new models is our phones. If the device is in working condition, you can sell if off and get some bucks to cover the expense for the next purchase. But before you sell it off, there are some important things you need to do before you simply dispose the smartphone. Because, nowadays, our smartphones are like digital diary containing many important information about us. And it should not land in the wrong hands for your own good. In this post, we shall see the Things To Do Before Selling Your Android Phone To Someone.
1) Backup your data
This is the most important step. Do not hurry. Take your time to back up your data before selling your smartphone. We’ve heard many painful stories of people losing their personal data when switching to a new phone.
Some important data which need to be backed up can be anything such your contacts, call records, messages, photos, videos, documents, notes, songs, audio recordings, game progress, WhatsApp chats etc. The good thing is that some apps will store data on the cloud which you can easily retrieve again on the new phone by signing in with the same account associated with it. But for some, you need to take the pain of manually backing up.
Regarding where to backup your data, you can backup to the SD Card if there is sufficient space, or to a pen drive connected to the phone or to a computer.
1.1) Backup your contacts
This task depends on where you used to save your contacts whether on the SIM Card or phone storage or Google Account.
1.1.a) If you always used to save your contacts to the Google Account
Android phones allow you to save your contacts to the Google Account which you used to sign in to the Android phone. This is the most preferred way to save contacts as it will sync across your devices signed in with the same Google Account, and the contact are available on Google. You can also view your saved contacts on https://contacts.google.com from another computer as well after you sign in. The contacts will automatically sync to new devices again if you use the same Google Account.
So if all your contacts are saved to Google Account, no need to backup your contacts. They are safe.
1.1.b) Backup contacts if you saved contacts to phone storage
If you saved your contacts to phone storage, then you need to backup your contacts before you sell off your Android Phone. Most Android phones will allow you to export your contacts from the contacts app without the need for any additional apps.
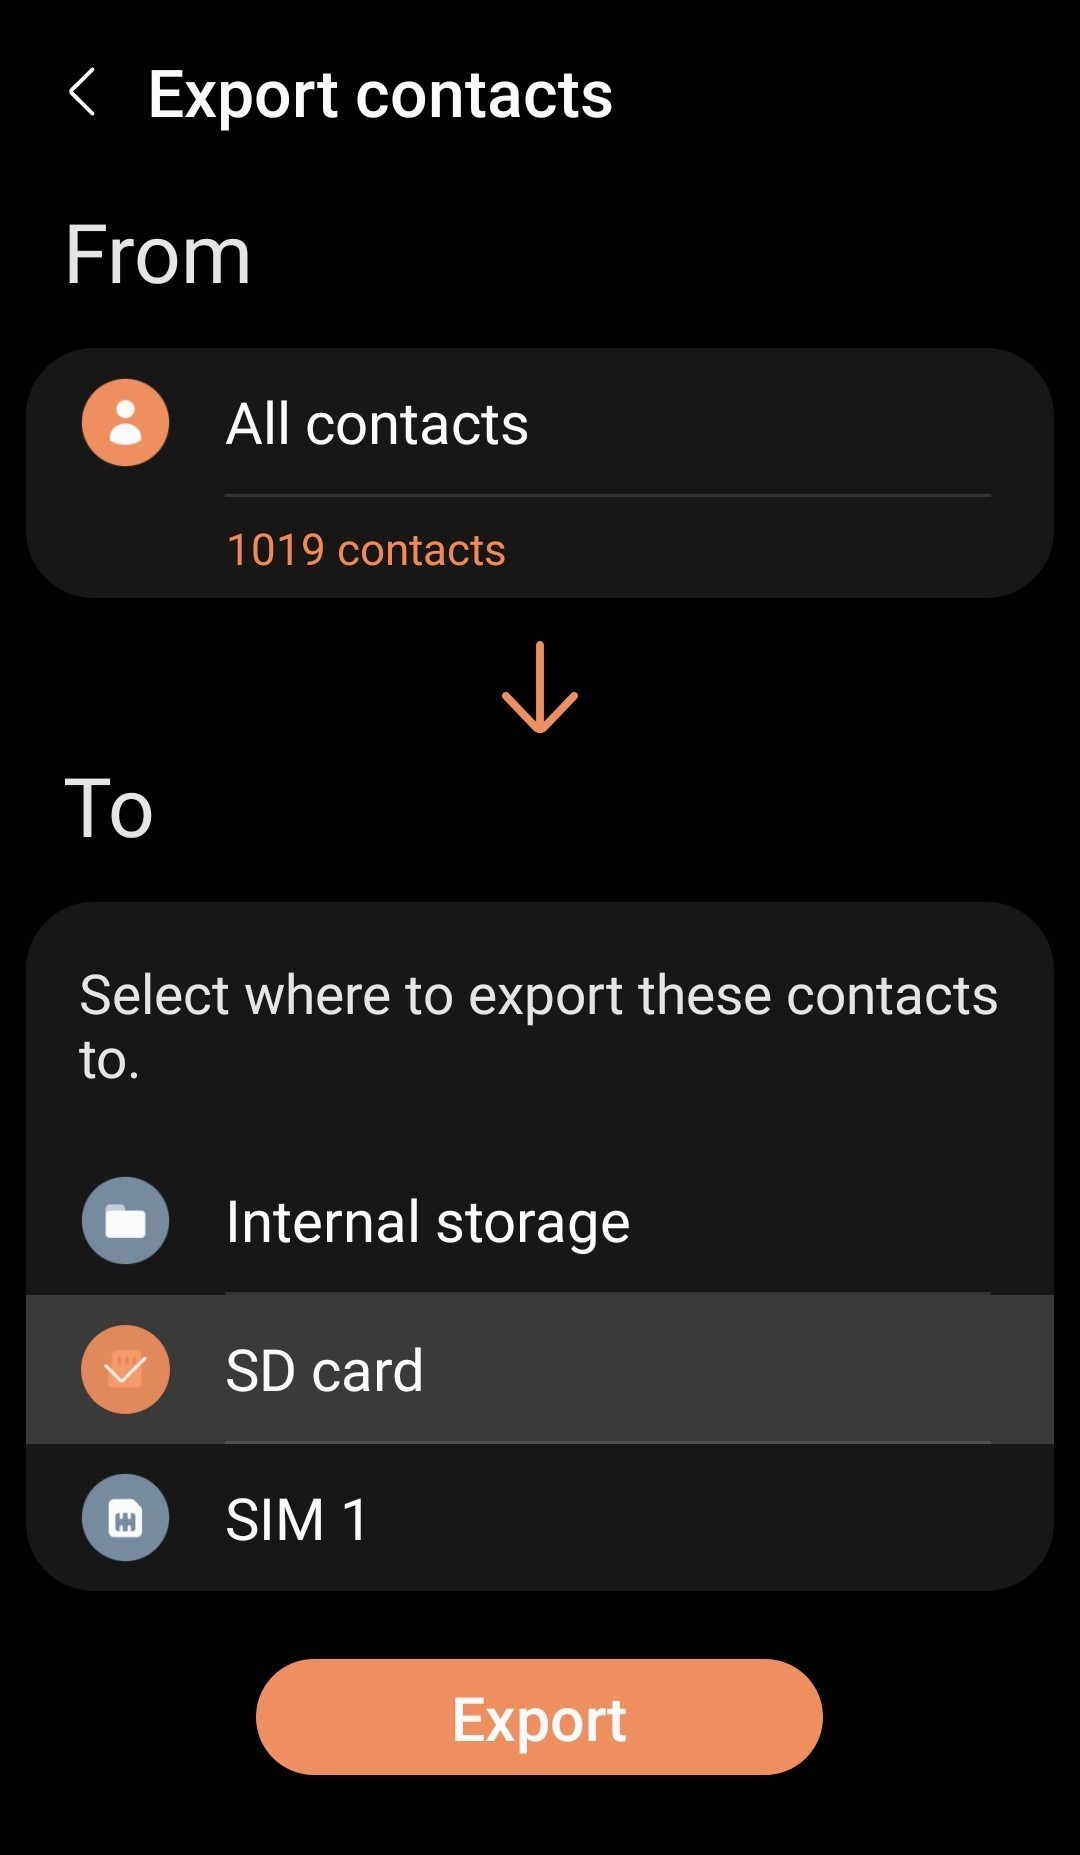 To backup contacts saved in phone storage to SD Card in Samsung Android Phone, do the following:
- Open the app drawer and find the contacts app (not from the dialer – as some features may be absent)
- In the contacts app, go to its settings menu
- Open Manage Contacts > Import or Export Contacts
- Tap on EXPORT
- Select SD Card
- Tap EXPORT
The navigation may vary from phone to phone, but the general steps may be the same.
You should be able to export all your contacts to the Phone’s internal storage or SD Card. Better save it on your SD Card, so that you can import from the SD Card later on the new phone.
1.1.c) Backup contacts if you saved contacts to SIM Card
Contacts can also be saved to the SIM Card but it has limited storage capacity. SIM Cards comes in various capacities but typically it can hold around 250 – 300 contacts only.
If you are going to retain / keep the SIM Card with your, then you do not need to backup the contacts saved in the SIM Card. Otherwise, you can export the contacts from the SIM to SD Card. Explore the settings menu in the contacts app of your phone for options.
1.2) Backup your messages (SMS)
You may open the messaging app on your phone and explore in the settings where there is an option to import/export SMSs. Usually, there won’t be import/export options in the messaging app on your Android Phone. In that case, you will need to use third-party software like SMS Backup and Restore (Google Play Store), which will allow you to export SMSs and also use the same app to import the SMSs in the new phone.
You can first install apps like this and backup your SMSs. Before you do, it may be better to delete unwanted SMSs first and then perform the SMS backup. Using the app, you can backup the SMSs to the SD Card if you have one. Otherwise, backup to the phone storage and transfer it to the computer and restore later to the new phone.
On the new phone as well, you may need to use the same app to import the SMSs.
1.3) Backup your photos / videos
Android phones allow backup of photos and videos to the Google Account (Google Photos). Google Photos is the preferred way to backup photos/video from Android phone. Google Photos comes with Android smartphones by default. And since the photos / videos are save to Google Account, they will sync back to the new phone if you use the same Google Account. By default Google Photos backs up the photos and videos in the DCIM (camera) folder on your phone.
To check if your photos are backed up to Google Photos:
- Find the Google Photos app on the phone and open it.
- Tap on your Google account icon at the top right corner of the screen and check the backup status (Backup is off / on etc.).
If you use Google Photos to backup your photos and videos, and if all the phones and videos are already backed up, then you need not backup.
If there are some photos/videos not yet backed up in other folders, then you can select them in Google Photos app and backup to Google Photos as well. But note that, the free space provided by Google is 15 GB combined. So be wary of that as well. Also, backing up a large number of photos/videos may also take time.
If you don’t backup your photos to Google Photos, or if you have photos / videos somewhere else in the phone storage other than DCIM / Camera folder, then you should move them to your SD Card or to your computer.
If you do not want to take the trouble of all this, just backup all your photos and videos to SD Card or to your computer.
1.4) Backup your documents
Documents can also be backed up to Google Drive from your phone. But if you do not want to go that route, simply find the folders where your documents are saved and move them to the SD Card or or pendrive connected to the phone or backup to your computer. You should check downloads folder, documents folder or other folders you created on the phone for documents.
1.5) Backup your notes, songs, audio recordings, game progress, etc.
For these types of data, you need to explore the respective folder in the phone storage and backup. For example, for audio recordings, check ‘recordings’ folder.
TIP: On Android smartphone, install Google Keep app and use if for notes. Since its a Google app, the notes are saved to your Google account. So there is no need to backup as the notes will sync to the new device if you use the same Google Account.
1.6) Backup WhatsApp chats
If you are using other messaging apps like WhatsApp, then you should backup WhatsApp data. WhatsApp chats are automatically backed up and saved daily to your phone’s memory. Depending on your settings, you can also periodically back up your WhatsApp chats to Google Drive. This is the easiest way to restore WhatsApp Chats on a new phone.
To backup WhatsApp chats to Google Drive.
- Open WhatsApp.
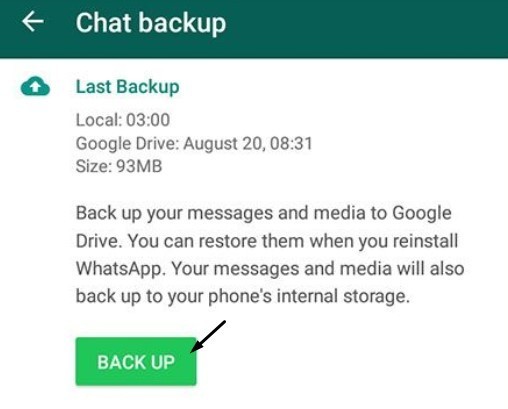
- Tap More options> Settings > Chats > Chat backup
- Here the last backup is displayed.
- Tap on ‘BACK UP‘ button to take latest backup to Google Drive.
When you setup WhatApp again on the new phone, you can opt to find backup and restore.
Alternatively, you can copy the entire WhatsApp folder in the phone’s storage and back it up. When setting up WhatsApp on the new phone, after the Phone Number is verified, WhatsApp will automatically detect the presence of an existing local Backup File on your device. On the next screen, tap on the Restore button to Restore all your WhatsApp Chats.
Besides the above, you should explore all the folders on your phone and see if there is anything else to backup before you lose it.
2) Remove All Accounts
After backing up and transferring all your data, remove all the linked accounts from your Android phone. This includes your Google account, Microsoft account, WhatsApp account, social media profiles, and other miscellaneous accounts on third-party apps. This is also important as many services keep record of the devices used.
A factory reset (next step) will erase everything on a smartphone but it doesn’t log you out of the Google account(s). Even after factory reset, you may still see the device on Google’s ‘your devices’ which you can check here https://myaccount.google.com/device-activity.
NOTE: Removing accounts is important – If you factory reset your phone without removing your Google account, the next owner might not be able to use the phone or sign in to their Google account since the device owner may still be you. Google keeps records of ‘your devices’ which you can check here https://myaccount.google.com/device-activity. You can sign out from there if there are some devices listed which you no longer use.
Follow the steps below to remove your Google account from your phone.
- Open your device settings > Go to Accounts and backup.
- Tap Manage accounts.
- Select your Google account and tap Remove account.
- Tap Remove account again to confirm.
Note: the steps above may vary from phone to phone.
3) Check for and remove microSD cards
If you are using SD Card with the Android Phone, remove it. If you are also going to give away the SD Card with the phone, then format it.
To format the SD Card on Android Phone, open the file manager.
- Open more options menu > and tap on FORMAT.
- Or you can also format the SD Card from Settings > Storage > Select SD Card > Open Menu > Format.
4) Don’t forget to remove the SIM card
5) Factory reset
It is an important step to factory reset your phone before selling it. Factory Reset of Android phone wipes off all user data from the phone’s memory and bring it to factory conditions. So the next owner cannot access any of your personal info. It also makes the Android Phone run smoother since all the files and apps you downloaded will be erased, cleaning up the RAM and internal storage.
Follow the steps below to factory reset a Samsung Android phone
- Open your device settings.
- Find General management > go to Reset > Factory data reset.
- Tap Reset again.
- Enter your lock screen password
- Tap Delete all.
6) Clean your old phone and put all accessories back in the box
Clean the phone and put all accessories back in the box such as the charger, cable, etc. Buyers would like to buy the phone along with its accessories. It may also help you get a better price. If you have the original purchase receipt, it may also be useful for the buyer.
So, before you sell you Android phone, do the tasks as stated above. This is for your own good so that your data is not exposed to someone else, whether they may or may not misuse it.